Ok Chinese Lantern Info

This is what I am using..
Its the Ris Paper Lantern
available from IKEA
I got the biggest size available ( 60cm)
It cost 8.99 CDN..without cord. The cords at Ikea are rated only for like 65 watts...Not enough to do this safely. So I went to home Depot and bought a heavy duty light cord, they sell some that are good for 250 watts. Got me one of those.
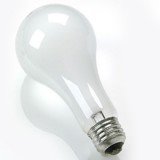
Then I hit Vistek (CDN Photography store) and picked up 2 GE Incandescent Lamp bulbs, they are 250 watt, 120 volt, with a Kelvin temp of 3200K. These babies were like 6 bucks each, and last for 3 hours. That's why I picked up 2 of them.
**DOWNSIDE**
These bulbs get HOT...So I only ever use them for just a few minutes, while I'm shooting, and I never ever leave them unattended, TOO MUCH of a fire risk! Please be careful!
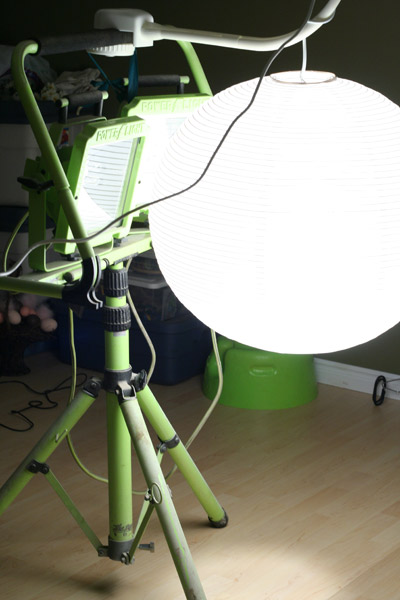 Now came the hard part..To figure out how to suspend this 60 cm ball. I ended up using my DH's old worklights (mostly b/c they were in the room). And I disassembled my son's old crib mobile and strapped it onto the top bar of the worklights. My DH is graciously building me a nice stand for this from copper tubing, but that may be awhile!
Anyways that's what I'm using..No ambient light, I have covered my one big window with my navy denim drape, and I turn off the room light. I do a CWB with a big piece of white foamboard, set my WB to that, then shoot away. I have another white foam board on the opposite side of the light, trying to act as a reflector, sometimes it works really good, but lots of times not so well.

SO I just snagged this! off of eBay for half price what they are in the stores here! I'm so pumped! Its 42" and a 5 in one relfector...Should be here next week!
Anyways back to the setup.. I have the light suspended only about 18 inches off the floor, because most of my pics my kids are sitting down for, I just adjust the height of it based on the catchlight in their eyes. An the light is just forward and off to the side some, so I get the same catchlight in each eye. Often I am crouching just below, or laying on the floor really close to it. I have not figured this out completely yet, I still tweak things each time I set up, but it is getting closer!
Hope this helps some!..If you have any questions just ask I will try to answer what I can..Again I am no pro at this set up..I'm still in the learning process too!
posted by Deanna at 12:42 PM
![]()


7 Comments:
wicked...thanks so MUCH for the tips Deanna. Cool that dh is building you a stand. Looking forward to more of your work. You are my inspiration to keep at this. Ok well that and my dad! (wink)
thanx for the kind words P...im having a bad day today, those words couldnt have come at a better time..DARN kids would not be still for even a fraction of a second today....so frustrating! take care!
lol...
here take MINE for a day!! snicker!
yw
Thanks so much Deanna!! This will really help. You're awesome mama!!
Hey you - so here I am leaving a comment I did not even see that you could lol.
Great site deary. Love to read up what you are up to :) you are a great photographer you are just an awesome person I feel like I have known you forever which its been like what 4 yrs now i think lol time flies.
Anyways WTG !!!!
Dang Deanna! You are effective!
ROFLMAO..@ claudia...thank you kindly for the words of kindess you ass kisser! LOL. j/k...weird to think we haveknow each other that long isnt it?
and Talena....effective? ROFLMAO...cant your medical transcription knowlegde come up with a better word? LOL..I'd better go check your blog..see how schools going!
Post a Comment
<< Home